Jessie, thanks for the info,
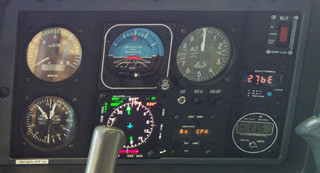
I am looking at engraving my new panel, it is 2mm thick and the engravers are looking to go to a depth of 0.3mm is this about the same as you use ? I am looking to get a finish of the high quality that the panel above has.Somebody I know had a load of engraved decals done for a big Cessna twin which he substantially rebuilt, a few years ago.
He told me he will never post on EuroGA  but I have an email address for him so could ask him, if anybody is interested. I flew in it once (it is my only ME time ) and they looked very good.
However I would think there are many engraving services around. A google on engraving service digs out pages of them.
Did you use the JPI optional flush mount kit?
No, there is not enought space for these flush mount kits, so a custom solution is made.
How is the paperwork done for the handheld GPS mount? That has been a grey area in the UK, and also on N-regs. The GPS itself has to be removable – in theory
That is part of a minor change approval. The GPS itself is still removeable, and not to be used for navigation. My customer uses it for the person sitting RH so they can monitor the flight.
Are there any interconnections between that GPS and anything else e.g. flight plan crossfill to the GPS (I realise _from the GPS is 100% not legally possible and may not even be practically possible, with the Garmin gear).
That GPS is interfaced with GDL39 with 3D (AHRS) option. It also receives flight plan information, it does not talk to other equipment.
I am looking at engraving my new panel, it is 2mm thick and the engravers are looking to go to a depth of 0.3mm is this about the same as you use ? I am looking to get a finish of the high quality that the panel above has.
That is about the same that is used here. How deep you would do depends on the finish. This panel has been made from the proper grade aircraft aluminium. Do not use household quality of aluminium for this, and be sure to keep bending radius large enough for aircraft grade aluminium.
We can do have an own CNC lathe, mill and router to produce custom parts, powder coating and infill was also done inhouse. Doing this inhouse has the advantage of being able to correct things quickly if needed, and being sure aircraft aluminium is being used, this also requires different settings as it is harder to machine then regular grade aluminium.
Jesse, what is wrong about “kitchen grade” alu for an instrument panel? It doesn’t have to bear any structural stress, does it?
(My own is being redone in polyester, until someone convinces me it needs to be epoxy at least. Engraving is the last concern, at this stage; and one advantage of having very limited instruments is that one can remember what they do without placarding… )
There is no such thing as aircraft grade aluminium. If anything 7075 alloy is often referred to as “aircraft grade” because it is the strongest commercial alloy, but mostly 2024 and 6061/6082 is used in aircraft. 7075 is popular in bicycles, and I highly doubt it is used in aircraft panels anywhere. If you use 2024 alclad you do not want to engrave it, destroying the clad and exposing the core. 6061 or 6082 would be much better, and maybe even some 5xxx due to corrosion resistance.
There is no such thing as aircraft grade aluminium

Aircraft grade aluminium clearly exists because it is mandatory for LED flashlights 
Jesse, what is wrong about “kitchen grade” alu for an instrument panel? It doesn’t have to bear any structural stress, does it?
Actually there is quite some stress on it. their is quite some weight from instruments on panels, and it must be able to withstand some G load without deforming as well. There are multiple reinforcement on these panels. Then their is a manufacturer which use specific material, which you would like to follow.
There is no such thing as aircraft grade aluminium.
True, but I am quite sure you are also aware that not all readers will know the difference between these alloys. On a certified aircraft you can not pick what suites you best, like on an homebuild or experimental. “kitchen grade” alu often doesn’t come with a code, so your not quite sure what you would buy. The bent radius is quite different between the softer “kitch grade” and the “aircraft grade”
As Jesse says, there is a lot of stress on instrument panels. When I was re-arranging my RHS panel
the AI and the EHSI were especially heavy and the back of the panel was reinforced. Fortunately when two instruments are one above the other, and are of comparable weight, the bending moments (due to a G force acting downwards or upwards) on the worst-case-supported spot on the panel – the centre of it – are almost cancelled.
The original Socata material was about 2mm and most of it was increased to 3mm, by bonding and flush riveting a reinforcing plate on the back. I think I posted photos here at the time. Beyond 3mm you have to do some machining on the back of it because most rear-mounted instruments (such as altimeters) cannot go into a thicker panel. Well, they can but they look wrong.
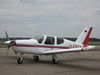
Very nice work, Jesse.
I heard from the guys at the Aspen booth that you were also at AERO but I was just about to head home. Will see you again for the next avionics-check.
Roland
Thanks Roland, very welcome!