Silvaire wrote:
Also the carb mounting spigot rubbers if they look at all rough.
These are well worth changing. It’s hard to inspect them and they do go bad.
Congratulations IO390 for this project.
I understand you lead it for a friend who bought the Europa. Very kind of you.
I had the opportunity a year ago to recover an Arrow 3 which is sitting outside since 2017 or 2018.
With all the supply problems, and the price of planes dropping, I would say now is the time to buy an all-equipped plane instead of a project.
YMMV
WilliamF wrote:
These are well worth changing. It’s hard to inspect them and they do go bad.
These are included in my “replace anything squidgy or flexible” regime. Although I have carb rebuild kits on order I am tempted to just send them off for overhaul.
Jujupilote wrote:
I had the opportunity a year ago to recover an Arrow 3 which is sitting outside since 2017 or 2018.
With all the supply problems, and the price of planes dropping, I would say now is the time to buy an all-equipped plane instead of a project.
YMMV
For certified I’m not sure I’d want to buy a project unless I was really confident about its condition, so yes I agree. With this plane being permit we are more flexible as to what parts we can use, but the overall condition of the plane is really good, it just needs lots of inspection and general maintenance due to 3-4 years of no use. It’s more a “rolling restoration” than a full rebuild, and for the purchase price it is working out quite good value.
For the hand brake adaption we have found a pre made stick mounted master cylinder for the Ikarus C42 – quite cheap too so hopefully this will work.
Although I have carb rebuild kits on order I am tempted to just send them off for overhaul.
That’s what we are doing now on a 912. I probably could do it myself, but there are lots of “stuff” and a person who have done it a 100 times are much more likely to get it right.
Re Bing carb overhaul, If the engine is running well, meaning no plugged pilot jets or similar, overhaul will usually mean cleaning and replacing the rubber components that go bad over time. If the rebuild kit comes with float valves, needles and needle jets these can be replaced too. Cleaning everything is perhaps the hardest thing, people use ultrasonic cleaners if there’s a lot of varnish etc. Look at the floats to make sure they are not damaged. It’s also worth looking at the throttle shafts and seals, if the carbs are really old the throttle shafts will develop wear and play from the intake pulses. I doubt this will be a problem on these.
It’s not too tricky a job, they are simple devices. I’ve always liked that Bing float bowls are held on by clips versus screws for easy access, and everything else is pretty easily accessible too.
If you want to have them overhauled by somebody else and a Rotax experienced mechanic is not available, somebody who works on old BMW motorcycles (early 70s through mid-90s) will have done these, likely many times – they are the same design, varying only in bore size and jetting details depending on the particular engine on which they are installed.
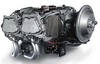
Quite a bit of progress has been made since the last instalment, with the first priority being finishing the firewall forward items as well as the remaining fuel hoses.
The carbs were overhauled by a local BMW motorcycle specialist, who found various issues. One of the floats was too heavy, and the needles were quite worn. One of the carbs had the butterfly set completely closed at idle also, so the rebuild was definitely worth doing.
I spent some time looking for suitable hose clips for the oil hoses. Most people just use Jubilee type clips which are fine, but one had already failed and I don’t really like them in totally critical applications. There are a number of hose clamp types that are secured with a bolt and are far more substantial, but after trying several different brands, I found that they were all quite cumbersome and none of them were round when tightened, so the clamping force was not spread evenly throughout the circumference of the hose.
Following many hours of googling I found that Mikalor make a really nice hose clip, so these were used. They are nice and compact, and they clamp down evenly on the small diameter oil hoses.

The oil hoses were also firesleeved and I fitted a heat reflective blanked on the areas near the muffler and exhaust manifolds.
While the exhaust and intake manifolds were removed, the valves were inspected and these were all in really good shape. No cracks in the exhaust either (for now – it will happen sooner or later on this exhaust as it’s a pretty poor design on the classic Europa).
Oil cooler fittings replaced and the radiators were repainted, with all new silicone water hoses installed. We then followed the Rotax procedure for purging the dry sump oil system. The engine is looking quite presentable now.

The fuel tank outlets have an aluminium insert which is held in place with a large diameter section of rubber fuel hose.
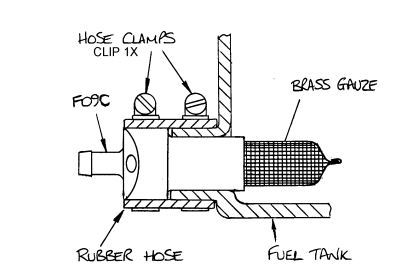
Problem is that the hose specified has a 25mm ID, yet the diameter of the tank outlet is more like 28mm. This would be OK if the access to this area was acceptable, which it is not! This is probably the most unpleasant and uncomfortable job that I’ve done on any aeroplane or car or anything. I will pay someone else good money to do this in future. The poor access is totally unnecessary as well, so it’s a combination of ill thought out design and the builder not installing sufficient inspection panels.

(That’s the rudder cable, it’s further away from the fuel hoses than it looks in the picture.)
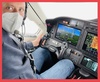
With that job out of the way, it was time to continue with the adaptions I mentioned earlier. In short, the owner/pilot cannot sufficiently hold the stick with his left hand, but can operate a throttle. Therefore we removed the brake and throttle from the centre console and fitted a plunger throttle on the left side of the panel, with a hand brake on the stick. This allows the right hand to be kept on the stick at all times except for actuating the gear handle when he can briefly swap hands.
The throttle was easy to fix, as McFarlane sell a Rotax specific plunger throttle, complete with cables and new throttle return springs designed especially for this throttle.

This went in the hole where the ignition barrel was. Because the key was not supplied with the plane, we removed the ignition barrel and fitted separate mag switches and starter button elsewhere on the panel.
The brake was a bigger problem. Monowheel Europas use a simple brake system with a single caliper and a single hand operated master cylinder. This system has no reservoir, and the brake hose is just plastic. In other words, the system is simple and seems to work OK, but it’s not exactly “aircraft grade”.
There are a few stick-mounted master cylinders available. I found only 3 on the market that might work, due to the requirement for a parking brake function. The first one I ordered was a Magura part (yes, the same people who make bicycle brakes) as fitted to the C42 microlight and I discovered that it had no reservoir, so would need constant readjustment. A proper hydraulic brake system will automatically adjust by exchanging fluid with the pressurised section and the reservoir when the brake lever/handle is not depressed, but these microlight type systems are filled once and then you adjust the handle to deal with hose expansion, temperature changes etc. Problem is that readjusting it requires two hands, which defeats the whole purpose of the project.
Next I found one made by Kaspar, which was beautifully made and a big improvement over the Magura part, but unfortunately not usable due to no reservoir again.
This was a little frustrating as I had to order these parts in order to see if they would work or not, as the sellers didn’t know anything about them.
Finally I ordered the very expensive Beringer hand brake. This is ideal of course, but comes at a price. Frustratingly, the only online shop that stocked them (based in France), were initially communicative but then stopped responding to my emails when I asked them to ship to the UK, and completely ignored any contact thereafter. The only way I could get this was to order it to a French address through the webshop, so I had to waste 100EUR using a shipping forwarder.

The Beringer is nicely made and contains a reservoir, park brake and the handle position is adjustable.
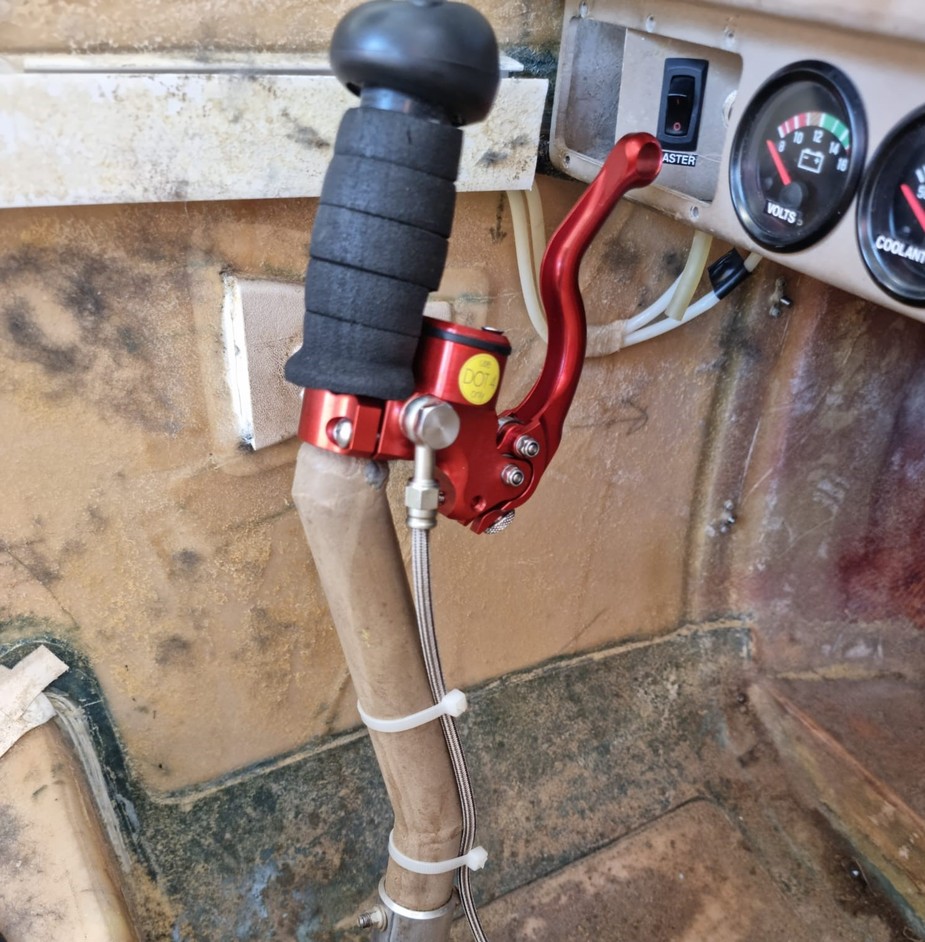
I made up a steel braided brake hose, which was surprisingly easy to do. You can buy the hose and the fittings cheaply, and they assemble in a similar fashion to AN hose fittings.

This turned out to be a pain in the backside to bleed, and a couple of hours was wasted trying different methods to bleed the system. I didn’t want to buy Beringer’s special bleeding kit, but made do with a £20 pressure bleeding kit from Halfords that gets pressure from a car tire, and a bucket. Despite squirting a pressurised jet of Dot 4 in my face, this was a huge success and the new brake system works flawlessly.
What isn’t so convenient is that these mods need to be approved by the LAA. Basically, in the UK for a LAA permit homebuilt, any deviations from the specified design need to be approved. This is supposed to be quick, easy and cheap. In reality it’s cheap only, it takes ages and is a hassle. The LAA are very short staffed but would rather spend money on a glossy magazine every month instead of expanding their engineering divison.
The Europa is quite a long distance from where I live, so it’s a 3 hour drive on most days. This isn’t ideal.
To fix this, I’ve done tailwheel training and obtained use of this gorgeous 100HP Eurofox. Dropping into little strips in a taildragger is a new world of fun, and despite the slowish cruise speed (95kt), this cuts the 3hr drive to a 40 minute flight.

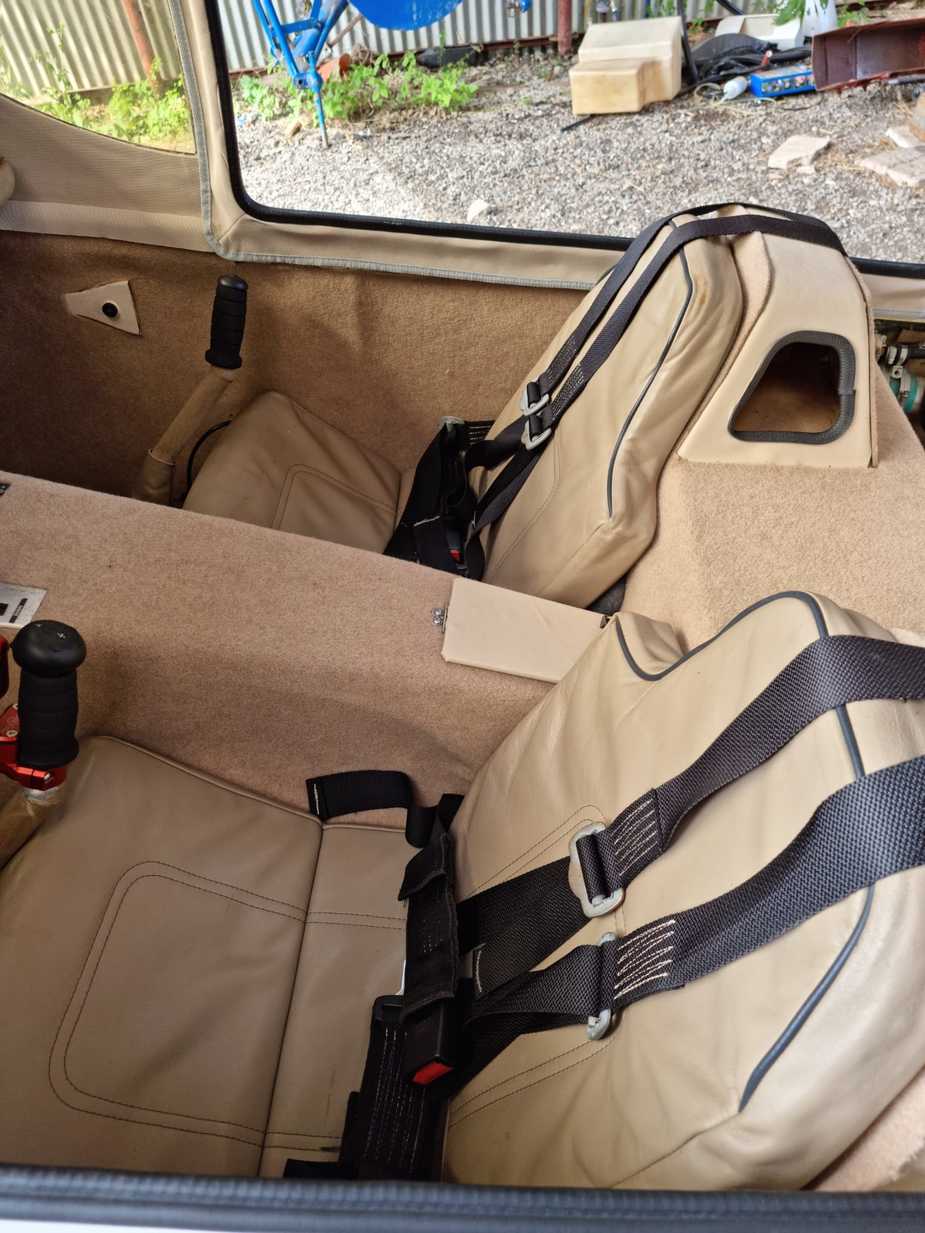
When the plane was purchased, the interior had been torn out by the previous owner. A brand new interior kit from Europa was included. Despite the annoyance of having the interior torn out, the original was an unpleasant shade of blue/gray that would have probably been very grubby and worn by now, and many older Europas are let down by their tatty interiors, so starting fresh isn’t so bad.
Various bits of carpet going in:

The interior kit sold by Europa has some pre cut parts, mainly for the headliner, but is otherwise quite basic and you need to figure a lot out by yourself. Despite neither of us having carried out any upholstery before, this went quite well and the new lightly coloured interior looks really nice. The panel is still grubby but this will be sorted at a later date, as messing up a fully working panel is going to open a fresh can of worms. The next part will be the seat back area and the luggage compartment, then it’s pretty much finished.

The panel is back in now too, hopefully for good this time.
An LAA inspector has now given the plane a once over, and the “to do” list is quite small. The only major issue found was some cracking around an aileron hinge:

The actual fibreglass isn’t cracked, but the cracked paint indicates that this area has been flexing which is a problem. This is quite common however and the fix involves grinding back the paint and making a fresh layup over the damaged area, so it’s quite straightforward. This job has been farmed out to a Europa expert.
Next is finishing the interior, rerigging the wings and checking out all the controls. Then it’ll be engine runs, and all being well, a first flight once the LAA have approved the mod paperwork.
Very nice progress, a pleasure to follow along.
Time for an update.
Following the last installment, the interior was finished and it came out quite nicely. IMHO a definite improvement over the average Europa interior.

Eventually, the mods were approved. This took something like 6 weeks, which is fairly quick as far as I understand it. Luckily these were simple mods with no actual engineering required. I’m especially pleased with the brake, as the combination of the Beringer master cylinder and the steel brake hose greatly improve the braking over the original design system.


With the engine and fuel system sorted, everything tested, controls inspected and greased, and a couple of other small items checked off such as the door bolt stop mod, the test permit was issued and the Europa made some test flights.
This all turned out to be fairly squawk free, with the exception of the vacuum pump giving up and the transponder not working. The artificial horizon has now been replaced with a Dynon D3 for the time being, and the transponder is still under investigation.
After the test flying, the full permit to fly was issued.
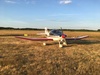
Meanwhile, the plane is flying well, it flies straight and level hands off with no weird tendencies. It happily cruises at 135kt TAS on approx 18-20l/hr, which is quite amazing really. Handling is excellent, nicely balanced controls and very direct and responsive, especially on the ailerons.


The only caveat of the 80hp engine is that the initial climbout with 2 POB isn’t exactly rapid, but once you get going the performance is really impressive. The plane is properly slippery, and I can imagine you’d easily get yourself into a pickle if you aren’t used to such a slick airframe as it builds speed rapidly in a descent. It’s perhaps no surprise that many Europa monowheel owners come from flying gliders. A good advantage of the monowheel Europa is that due to the massive tyre size, the plane can still be used on boggy grass strips when other types are stuck in the hangar.
In all, a great success. It shows how cheaply one can obtain and operate a touring aeroplane, though I must admit my friend did get a really good deal on the initial purchase. I’ve heard of C172 annuals that cost the same as this whole plane and restoration cost. Of course, one could spend 10k on flashy avionics but it wouldn’t make it go any faster, or improve the capability of this day VFR only aircraft.
IO390 wrote:
In all, a great success. It shows how cheaply one can obtain and operate a touring aeroplane, though I must admit my friend did get a really good deal on the initial purchase. I’ve heard of C172 annuals that cost the same as this whole plane and restoration cost. Of course, one could spend 10k on flashy avionics but it wouldn’t make it go any faster, or improve the capability of this day VFR only aircraft.
And this is exactly the essence of an aviator 
Looking’ good, well done, enjoy your baby.
And thanks for the report.