In the good old days, when A and C was a lad, the MLG bolts on the PA38s were simple affairs. Unfortunately, through Piper SB1200 (May 2009) and PA38 Parts Catalog, the AN bolts have been replaced with very costly NAS bolts.
No longer can one afford to replace them every Annual like we used to but they are indeed worth having an engineer remove them and inspect them annually.
Also, there used to be a CAA Airworthiness Directive mandating a 150hr repetitive inspection on the MLG axles. This was cancelled when EASA took charge.
having an engineer remove them and inspect them annually.
Yeah, okay, inspecting is never a bad idea…. But, what is the means and pass fail criteria?
I am not familiar with the orientation of those bolts, but I certainly accept as given that it is critical to safety. For such things in ferrous bolts, really only a magnetic particle inspection will assure that any defect would be found. The caring inspector with the magnifying glass, just will not be good enough. I suggest therefore, that to keep down time to a minimum, you buy one new set of bolts for the aircraft. Change them out at the next inspection. Have the removed ones MPI inspected. If they are defect free, perfect, tag them, and they are your next inspection’s bolts, for the same rotation MPI inspection. If MPI shows up a defect, you’re REALLY glad you had the MPI done….
To put a little more detail to what I was saying the landing gear leg is secured to the wing with one bolt that goes through a hole in the leg and two bolts that hold the leg to the wing using a saddle clamp.
It is usually the bolts holding the saddle clamp that fail, the result is that the landing gear is forced backwards rotating around the bolt through the leg until the load is two great for the structure and it rips the fittings out of the wing. The result is that the wing will most likely be uneconomic to repair.
The one aircraft I did see with this problem was fortunately only taxing at slow speed and the leg failed as it was crossing from the Tarmac to the grass, the wing was written off but the crew were unhurt, as a result of this the aircraft was broken for parts to service the other aircraft in the fleet, I would not like to speculate on the results of a high speed failure apart from to say that the results are not likely to end so well.
A quick visual inspection can be made by removing the panel covering the upper end of the gear leg ( six 8-32 screws if I remember correctly). I would take a look at this before the aircraft next flys and if you have any doubts don’t fly until the bolts are replaced.


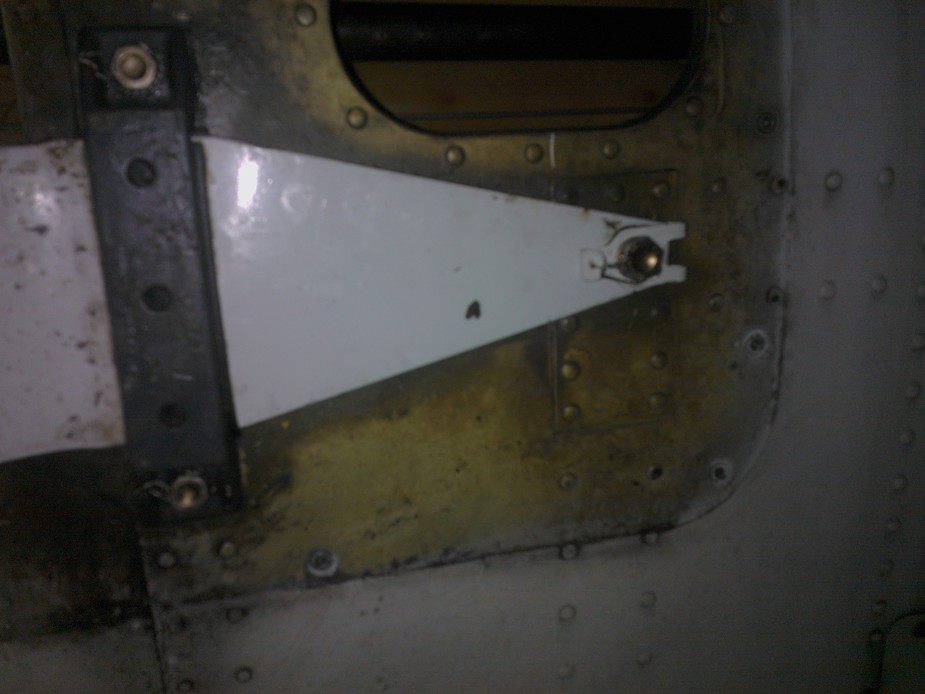

Some of these images are out of focus I’m afraid, but my phone wasn’t cooperating. This is where the right MLG strut attaches to the right wing. Don’t know if it helps, but I thought I’d upload the pics to let you all take a look. Let me know what you think!
I have fixed up the image links.
EuroGA doesn’t use the [IMG] notation. Please see Posting Tips on how to include images.
It’s time to get into the parts book, I seem to remember that the two bolts holding the saddle clamp were an Allen socket type, it is over twenty years since I was working the PA38 so my memory may be playing tricks on me !
What would be of more concern to me is the row of loose rivets along the inboard main spar, they need replacing at the next check.
Looking at the photos of the landing gear I don’t think there is an immediate danger of failure but you can only be 100% sure if you pull the bolts out and inspect them.
It’s probably not a good idea for me to take those bolts out is it? I will ask them to take a look on the annual. Sorry, but I don’t see any loose rivets? How can you tell? haha
Mind you, I still need to check the left one too, maybe something is visibly wrong there. Will do that today.
Cheers!
The rivets with black around them might be “smoking” (producing black around them from being loose in their holes). However, downstream of the engine, they could also just be surrounded by accumulated grunge. To assist in a proper determination, clean that area very well – zero black left around the rivet heads. Find a suitable tape of very good quality (painter’s masking tape is a good start) and tape them over outside, so engine grunge cannot get to them. Fly the plane for 10 or 20 hours, and remove the tape. If the heads are as clean as you left them, you’re probably okay. If they “smoked” while protected, they need to be changed. It is probably not too bad a job to do, depending upon the access on the inside, and size of rivet.
The line of rivets with the black marks around them are most likely loose, you can clearly see then in the second last photo.
As you say is is not a good idea for YOU personally remove the bolts unless you can get the aircraft on jacks and have acces to some form of NDT for the bolts. We annually replaced the bolts as the price of any more than a look with a magnifying glass and a quick spray with dye penitrant exceeded the price of new bolts, the aircraft were flying 6-700 hours a year so you need to base your inspections on this hourly rate, my best guess is that the fleet was the aircraft were doing about 4 landings per flying hour……… Most in the hands of student pilots.
It looks like the tails of the loose rivets can be accessed via the panel shown on the inboard of the photo, even if the wing had to be removed it is no great drama, myself and one other had the wings of a PA38 in under three hours, putting is back is another matter, the wing goes on with ease but bleeding the brakes is the thing that takes the most time.